Team
Introduction
Team section is a tool to make managing various users and groups, as well as managing their permissions easier. Here you can organize users into various groups as well as define the user's eligibility to access the information and perform actions by giving or denying various permissions. Workspace owner has the ability to make any workspace content more or less available to an individual or a group existing within that workspace.
Team section consists of Users and Groups.
Users page
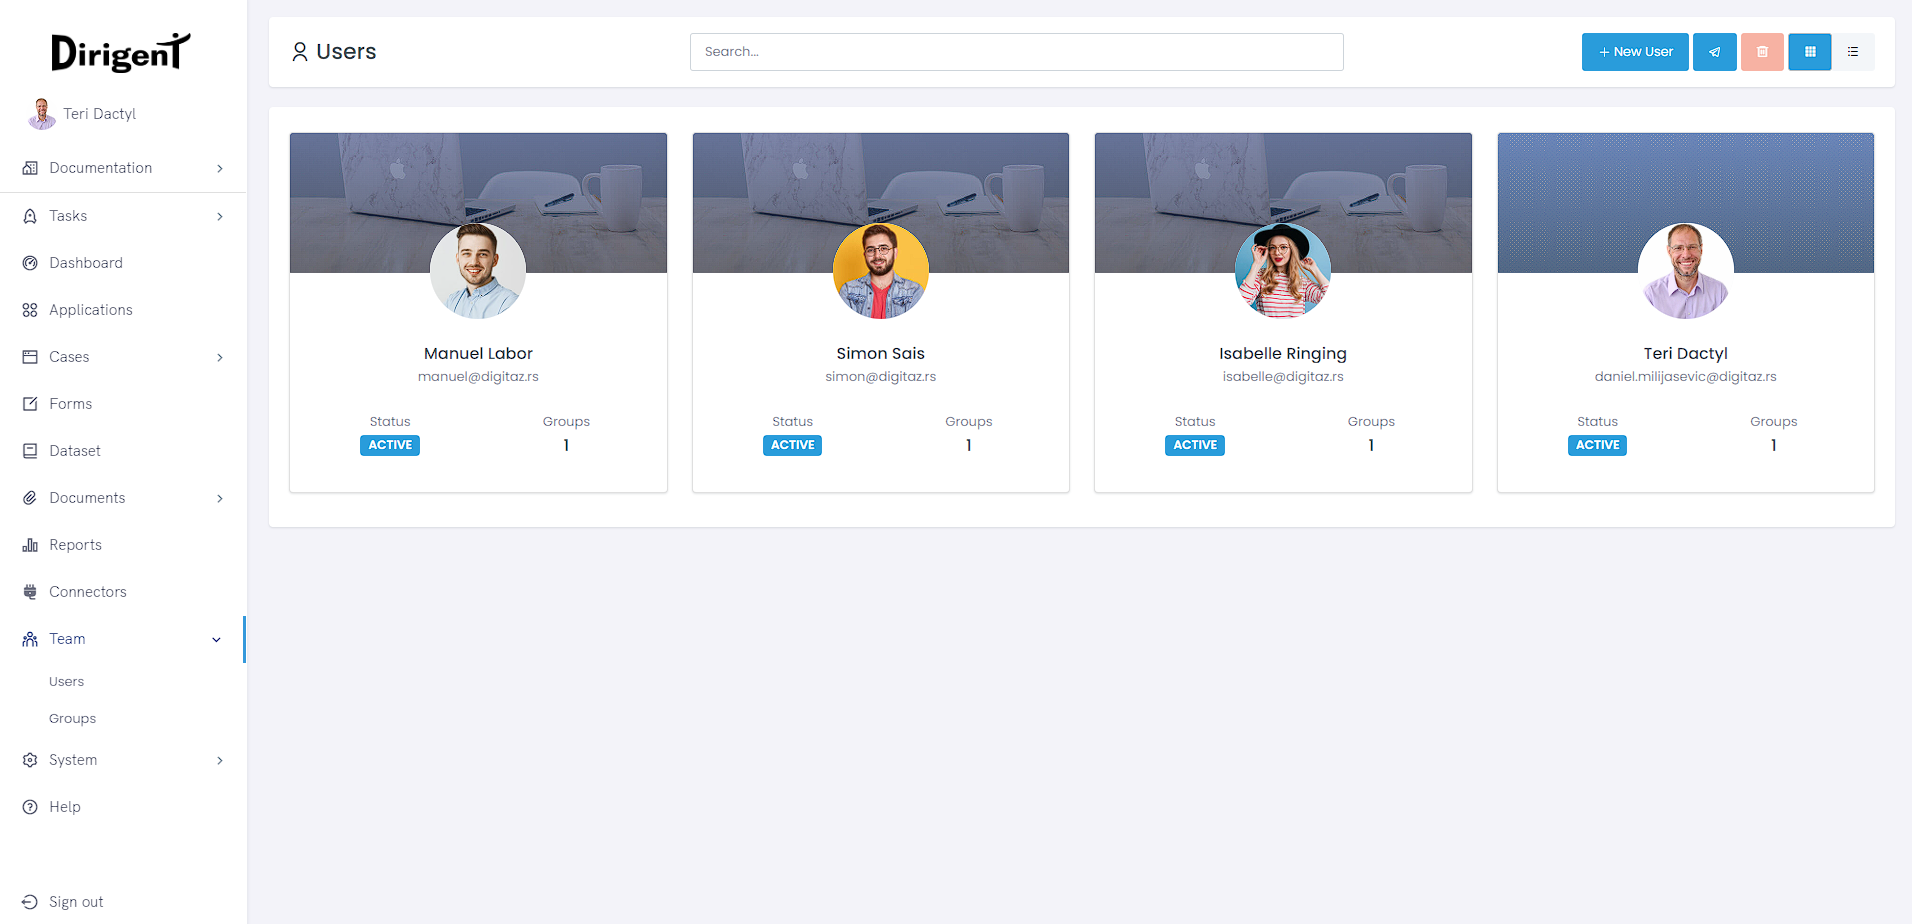
Users section is where all users within a particular workspace are administered individually. It also contains some basic information about the users such as their ID,Status, Username, First name, Last name, Last login, andGroups witch the user is part of. But before all of that, first we should invite some users to our workspace, and for that, Dirigent offers two methods:
How to add a user
But before all of that, first we should invite some users to our workspace, and for that, Dirigent offers two methods:
Send an inviation
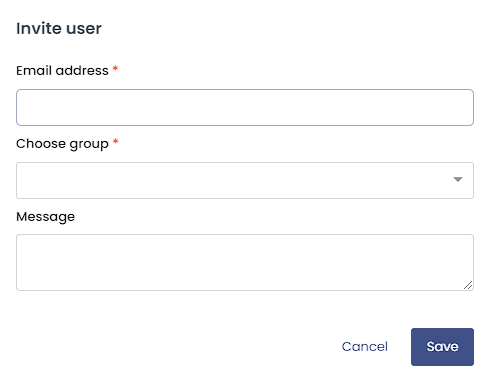
On the user's page, click on the "Send user invitation" button and fill in the required details.
-
Email address - Invitation to join your workspace will be sent to this address.
-
Choose group - When the invited user accepts the invitation, these are the groups he will be part of.
-
Message- A custom message that will be sent alongisde the invitation.
After the invitation has been sent, the user will appear on the list of all users that are members of the corresponding workspace. The invited user will be marked with the status Invited until the invitation is either accepted or declined.
Cancel an invitation
After the invitation has been sent, a cancel button will appear near the invited user. When clicked, you will get an option to notify the user that the invitation has been canceled, together with a custom message.
Add manually
On the user's page, click on the "Add manually" button and fill in the required details.

-
First name - User's first name.
-
Last name - User's last name.
-
Email address - User's email address used for log in.
-
Password - Set a password for the user used for log in.
-
Confirm password - Re-enter the password.
-
Choose group - Created user will be part of picked groups.
After you have filled in all required information, click on the Save button. The user in question will receive an email address which will contain login credentials.
User page
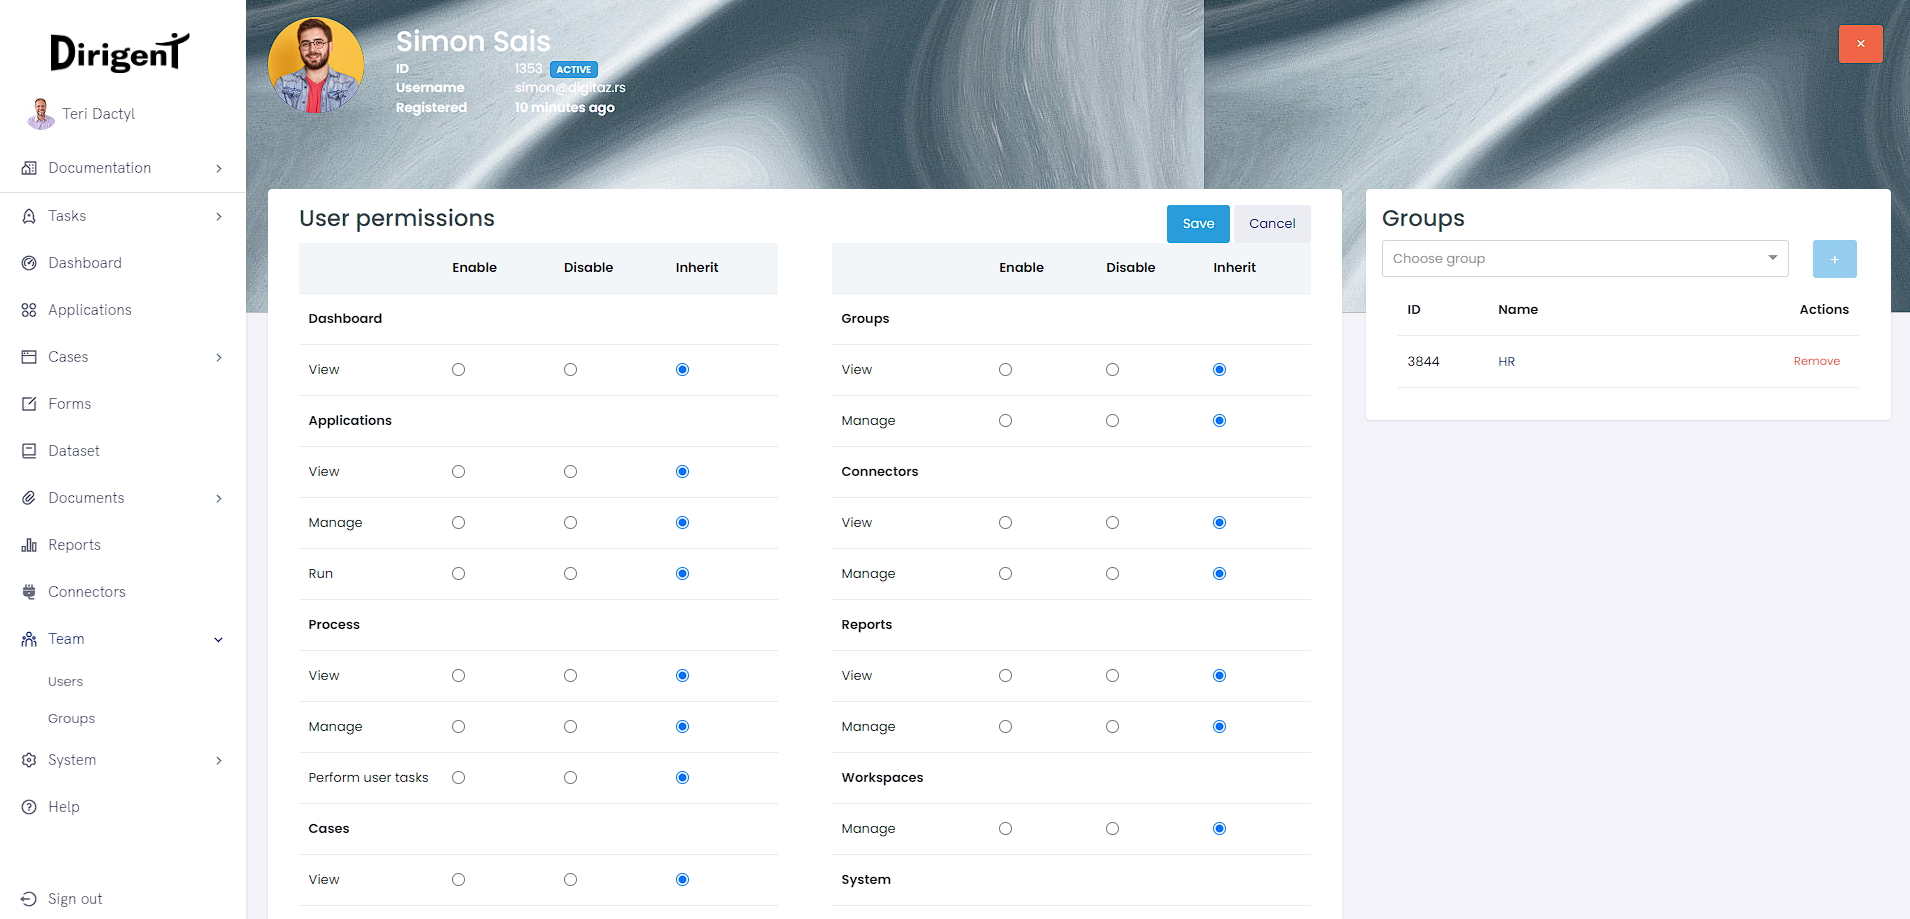
Click on any user from the list of users located on the main user's page in Dirigent to access any individual user's page, where you can easily manage or set the authorizations. On the left side of the page's header, a couple of user details can be found such as user's ID, username, and registered date. User can be removed at any time from the workspace by clicking the remove button.
How do I add a removed user?
Any removed user can easily be addded back by using the invite a user button. Add manually will not work in this case since the user already has an account.
User permissions and how to set them
User permissions are organized in a way that every page in Dirigent has it's own set of permissions which can easly be changed by changing the radio buttons associated with it. Depending on the complexity of each page, the permissions may vary in order to encompass everything.
By assigning user permissions, you will be setting the scope of access for that individual user in terms of actions and contents that will be available to him. Permissions have three possible options:
- Enable - Enables the user to acces or see the particular content.
- Disable - Disables the user to acces or see the particular content.
- Inherit - Inherits the permission access level from the assigned group.
Can I have a user be a part of a group but also have different permissions?
User permissions have higher priority over the group permissions, which means that you can have a user with different set of permissions that is a part of a group.
Assign a user to a group
If you want to add a user to a group, go to the individual user's page and simply select the group from the dropdown menu. Click on the + button and the user will be added.
Remove a user from a group
If for a reason you want the user removed from a group, beneath the dropdown menu will be a list with all of the groups the user is a member of. Simply click on the X button next to the group you don't want him to be a part of anymore and the user will be removed from the group.
Groups page
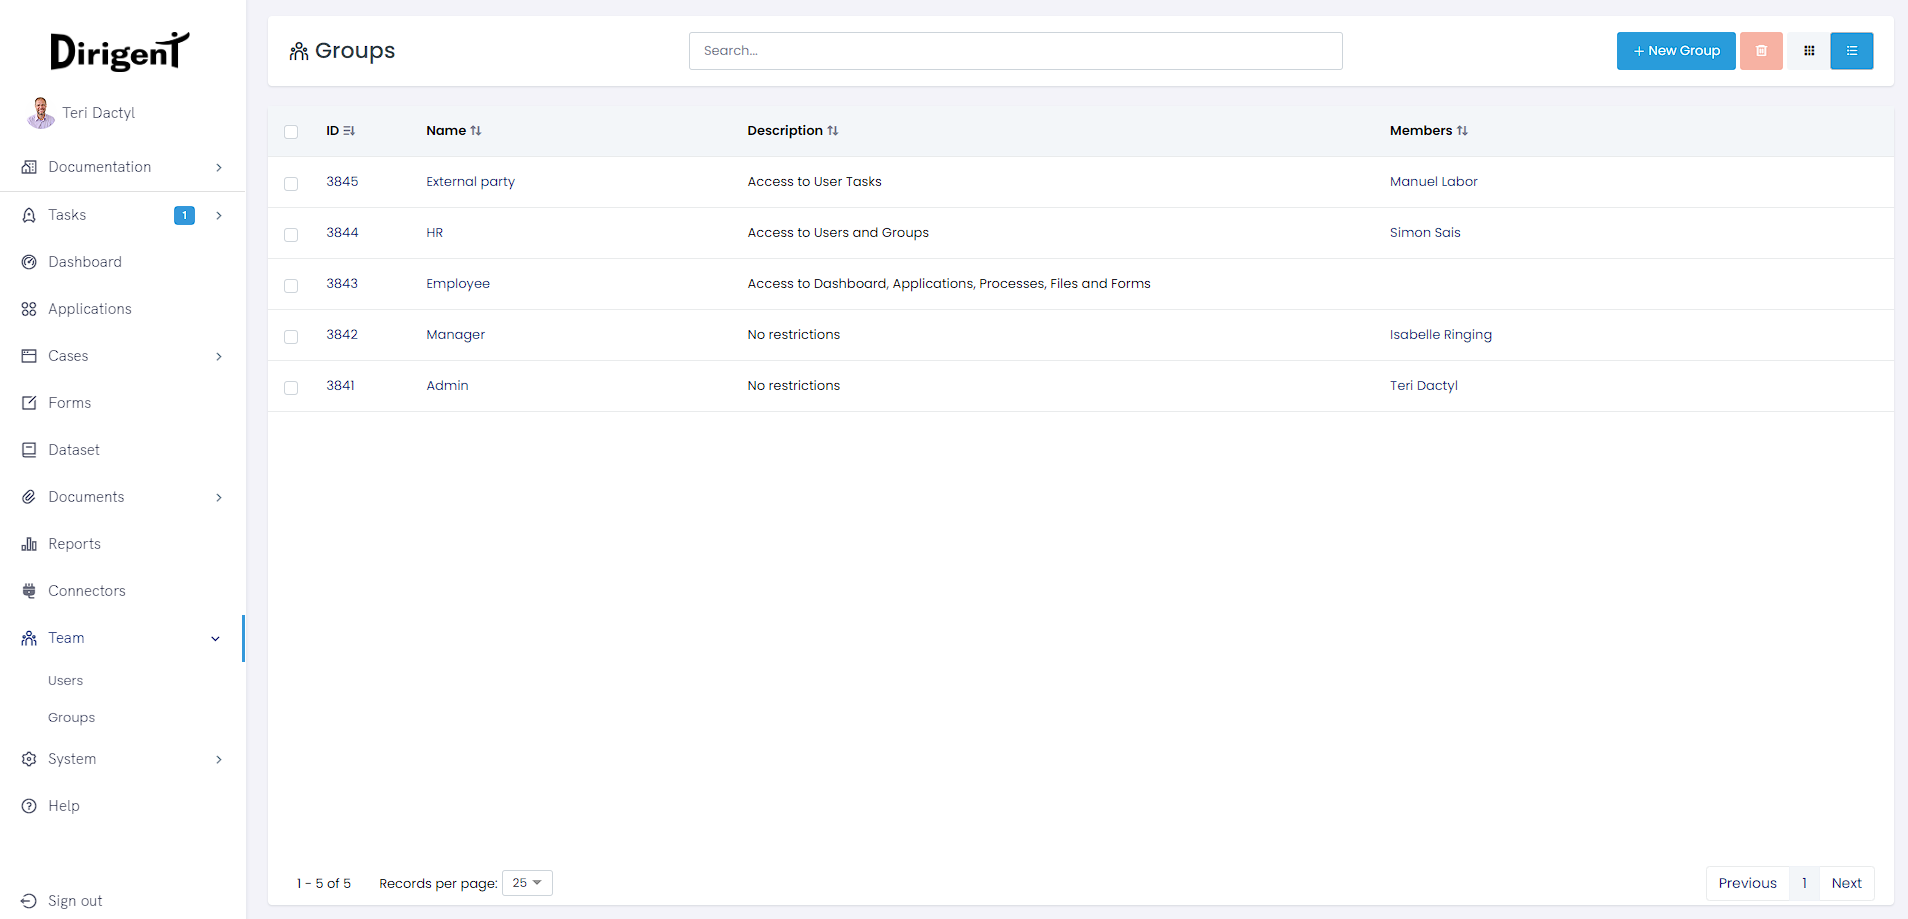
On the main group's page, you can find all of the existing groups. Various other information will be displayed as well, such as the name of the group, it's description, and the list of members that are part of the group.
Create a new group
On the main group's page, there is a + (New group) button. When clicked, a new window window will pop up requiring some additional information such as:
- Name - A name that the newly created group will be known as.
- Description - A description that will help explain what the group does.
Delete a group
If you want to delete a group, there are two ways it can be done. The group can be deleted from the groups page, by using the checkbox and the delete button. Designate the group or groups you want to delete by checking the checkbox associated with them, and then simply press the delete button. The other way a group can be deleted, is from the group's individual page. Just click the delete button, confirm the decision and it is done.
About group deletion
Groups that still contain members CAN NOT be deleted. If you wish to delete a group that still has users, you need to remove the users from the group first, in order for the group to become deletable.
Why groups containing users can not be deleted?
Belonging to a group dictates the user's presence within a workspace, so if you removed a group containing users that have no other groups left, all of them would also be removed from the workspace. With this, we make sure that no accidental removals occur.
Group page
Individual group page containts information about the permissions of that group as well as the current members. You can add new members to the group, or remove existing ones by clicking the corresponding buttons.
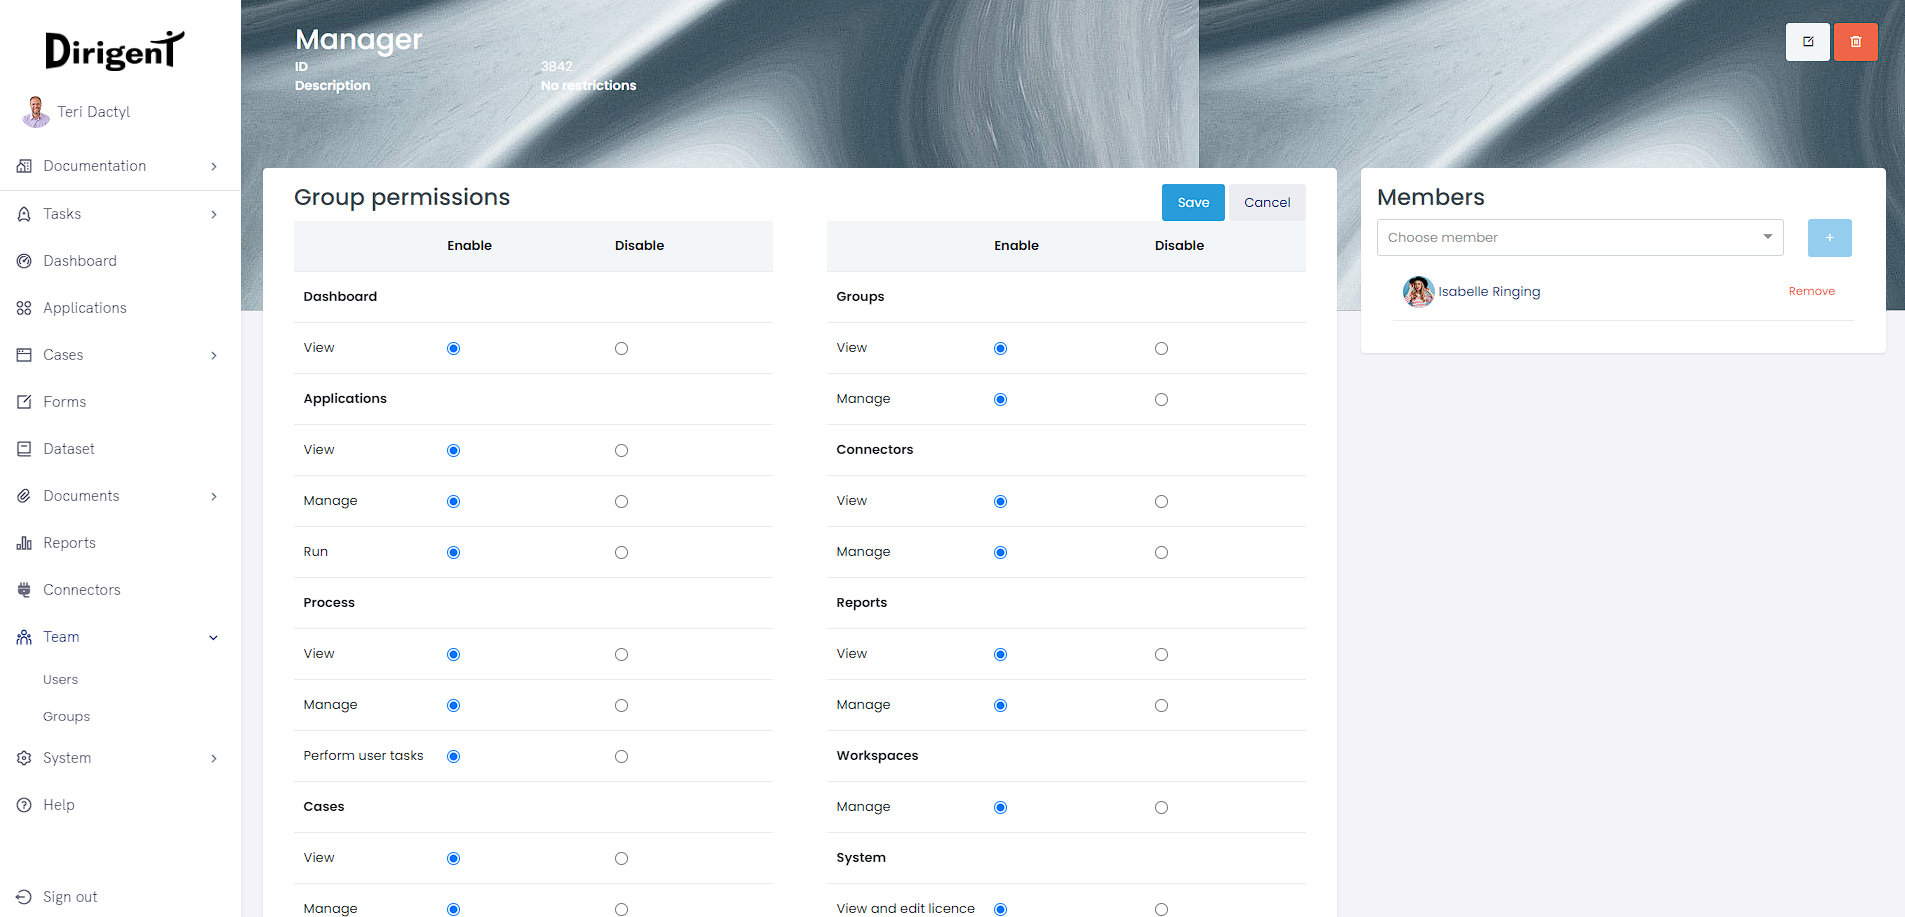
Group permissions
Group permissions are divided into 14 sections in total, and in order to customize the scope of access, the group will have in Dirigent in the terms of actions and contents, use the radio buttons along with the list. When you are done, don't forget to save the changes by pressing the Save button.
Group permissions only have two possible options: Enable or disable.